Thursday, September 6, 2018

[network] Using the Event Scheduler, 이벤트 스케줄러 사용하기


프로젝트를 하는 도중에 데이터가 쌓이지 않게 하고 싶었습니다.


그래서 이벤트 스케줄러를 이용해서 오래된 데이터를 삭제하는법을 배웠습니다.


*지금 내용은 '사운드 측정 프로젝트'과 연관있습니다.


생략된 부분은 프로젝트 게시물을 봐주세요.


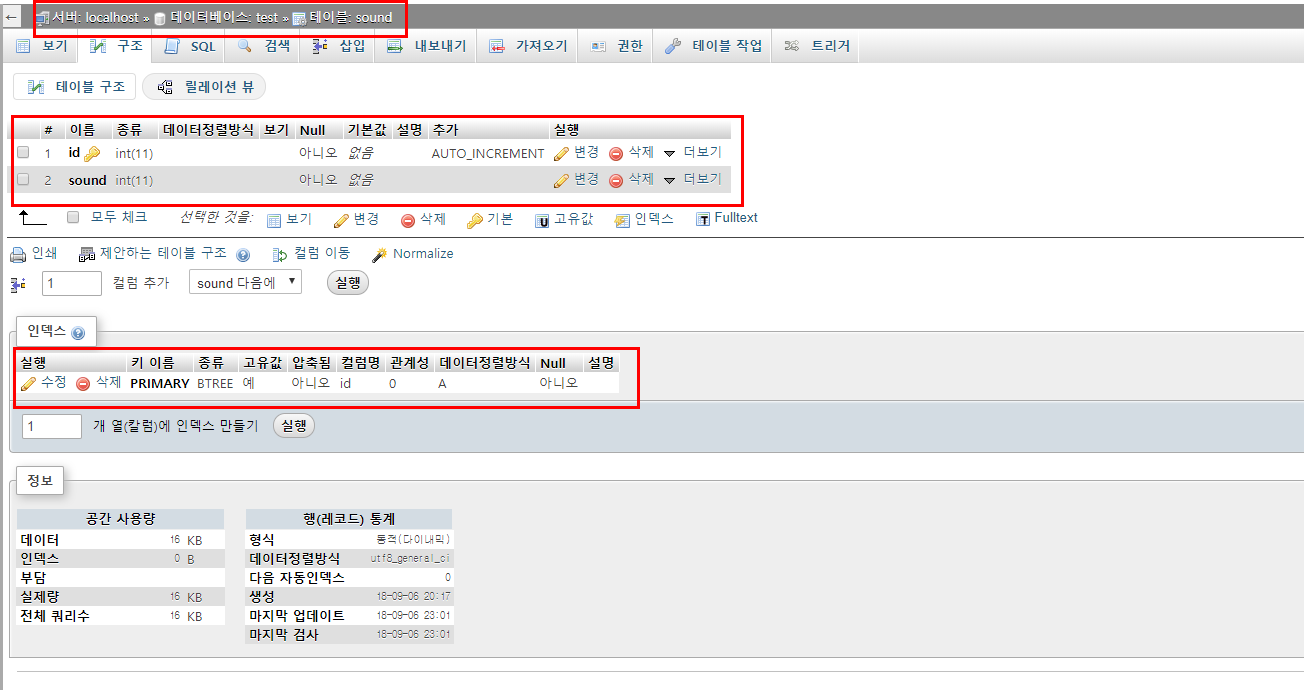
1. 먼저 다음과 같이 'sound' 테이블을 만들었습니다.


2. 그리고 test.php파일을 변경하였습니다.

<?php
//자신의 양식에 맞게 입력하세요
$mysql_hostname = 'localhost';
$mysql_username = '사용자 이름';    
$mysql_password = '비밀번호';
$mysql_database = 'test';
$mysql_port = '3306';
$mysql_charset = 'utf8';


$dsn = 'mysql:host='.$mysql_hostname.';dbname='.$mysql_database.';port='.$mysql_port.';charset='.$mysql_charset;

$temp = $_GET['d'];           //get방식으로 값을 받을겁니다.

try
{
$connect = new PDO( $dsn, $mysql_username, $mysql_password );

$connect->setAttribute(PDO::ATTR_ERRMODE, PDO::ERRMODE_EXCEPTION);

$sql = "INSERT INTO sound (sound, created) VALUES ('$temp', now())";
        //sound 테이블안에 sound 자리에 get방식으로 받은 값을 넣을겁니다.
    

$connect->exec($sql);
    echo "New record created successfully";


}
catch ( PDOException $e )
{
echo 'Connect failed : ' . $e->getMessage() . '';
return false;
}


$connect = null;

?>


3. mysql에 접속하여 이벤트를 활성화 시킵니다. 


빨간 박스 부분을 입력합니다.


그리고 다음 명령어를 입력합니다.


mysql > create event if not exists test_refresh
    -> on schedule
    -> every 1 minute
    -> starts current_timestamp
    -> do
    -> delete from test.sound2 where created <= subdate(now(), interval 1 minute);


이 코드는 test_refresh란 이벤트 이름으로

매 1분마다 실행하고

현재 시각부터 실행하고

'test'DB의 'sound2'테이블 안의 데이터중

현재로부터 1분이 지난 데이터는 삭제하는 이벤트입니다.


다음과 같은 화면이 나오면 성공입니다.


스케룰러는 phpmyadmin에서 확인 할 수 있습니다.


그리고 스케줄러를 끄고 킬 수 있습니다.


스케줄러 삭제는 

drop event '이벤트 이름'

으로도 할 수 있습니다.


I wanted to keep the data from accumulating during the project.


So I learned how to delete old data using the Event Scheduler.


* This contents are related to 'sound measurement project'.


Please look at the project posts for omitted parts.


1. First we created the 'sound' table as follows.


2. You have modified your test.php file.


<? php
// fill in your form
$ mysql_hostname = 'localhost';
$ mysql_username = 'username';
$ mysql_password = 'Password';
$ mysql_database = 'test';
$ mysql_port = '3306';
$ mysql_charset = 'utf8';


$ dsn = 'mysql: host ='. $ mysql_hostname. '; dbname ='. $ mysql_database. '; port ='. $ mysql_port. '; charset ='. $ mysql_charset;

$ temp = $ _GET ['d']; // Get the value in get method.

try
{
 $ connect = new PDO ($ dsn, $ mysql_username, $ mysql_password);

 $ connect-> setAttribute (PDO :: ATTR_ERRMODE, PDO :: ERRMODE_EXCEPTION);

 $ sql = "INSERT INTO sound (sound, created) VALUES ('$ temp', now ())";
        // In the sound table, we will put the value we got in the sound place in the get method.
    

 $ connect-> exec ($ sql);
    echo "New record created successfully";


}
catch (PDOException $ e)
{
 echo 'Connect failed:'. $ e-> getMessage (). '';
 return false;
}


$ connect = null;

?>


3. Connect to mysql and enable the event.


Enter the red box part.


Then type the following command:


mysql> create event if not exists test_refresh

    -> on schedule

    -> every 1 minute

    -> starts current_timestamp

    -> do

    -> delete from test.sound2 where created <= subdate (now (), interval 1 minute);


This code is called 'test_refresh' by event name


Run every minute


Run from the current time


Of the data in the 'sound2' table of 'test'DB


The event that deletes data that is one minute older than the current time.


The following screen will be successful.


The scheduler can be found in 'phpmyadmin'.


And you can turn off and off the scheduler.


Deleting the scheduler


drop event 'event name'


Can also be done.

[arduino] Sound measurement project (1), 사운드 측정 프로젝트 (1)


이 프로젝트는 결과적으로 사운드를 측정하여 

실시간으로 주변 소리 크기를 스마트폰으로 볼 수 있는 시스템을 만드는 것입니다.


APM(아파치, php, mysql)을 사용했고 

php는 PDO를 이용하였습니다.


1. mysql에 데이터베이스, 테이블을 만들었습니다.


저는 phpmyadmin을 이용해 만들었습니다.


설치 및 사용법은 구글링을 추천합니다.


데이터베이스 이름은 test

table이름은 sound입니다.


2. PHP파일을 만들어야 합니다.


 그 전에 PDO를 사용하기 위해선 php.ini 파일에

extension=php_pdo_mysql.dll

를 추가해줍니다.


주석처리가 되어있다고 하는데 저는 '찾기'해도 안나와서

직접 입력했습니다.


PHP파일은 htdocs안에 test1.php로 만들었습니다.


test1.php 내용은 다음과 같습니다.


<?php
//자신의 양식에 맞게 입력하세요
$mysql_hostname = 'localhost';
$mysql_username = '사용자 이름';    
$mysql_password = '비밀번호';
$mysql_database = 'test';
$mysql_port = '3306';
$mysql_charset = 'utf8';


$dsn = 'mysql:host='.$mysql_hostname.';dbname='.$mysql_database.';port='.$mysql_port.';charset='.$mysql_charset;

$temp = $_GET['d'];           //get방식으로 값을 받을겁니다.

try
{
$connect = new PDO( $dsn, $mysql_username, $mysql_password );

$connect->setAttribute(PDO::ATTR_ERRMODE, PDO::ERRMODE_EXCEPTION);

$sql = "INSERT INTO sound (sound) VALUES ('$temp')";
        //sound 테이블안에 sound 자리에 get방식으로 받은 값을 넣을겁니다.
    

$connect->exec($sql);
    echo "New record created successfully";


}
catch ( PDOException $e )
{
echo 'Connect failed : ' . $e->getMessage() . '';
return false;
}


$connect = null;

?>


3. 아두이노 IDE를 이용해 코드를 업로드 합니다.


파일 - 예제 - esp8266httpclient - basichttpclient 를 클릭합니다.


저는 wemos D1 R1 보드이므로 저렇게 설정을 했습니다.


다른 보드를 사용중이라면 그에 맞는 설정을 해주시기 바랍니다.


코드 수정은 2가지만 하면 됩니다.


WiFiMulti.addAP("와이파이이름", "와이파이 비밀번호");


http.begin("http://자신서버IP/test1.php?d="+String(temp));


자신서버IP는 cmd창에서 ipconfig를 입력해 IPV4를 보면 됩니다.


(예를 들어 192.168.x.x)


그 후에 업로드를 합니다.


정상적으로 동작하면 시리얼 모니터에 다음과 같은 화면이 나옵니다.


mysql에 들어가면 id는 하나씩 늘어나고

sound값이 들어오는 것을 볼 수 있습니다.


이를 이용해 여러개의 아두이노에서 mysql로 데이터를 보낼 수 있습니다.


The project will eventually measure the sound,


and It is to create a system that can see the surrounding sound volume on the smartphone in real time.


I used APM (Apache, php, mysql)


php used PDO.


1. I created a database, table in mysql.


I created it using 'phpmyadmin'.


Installation and usage is recommended for Google.


The database name is 'test'


The table name is 'sound'.


2. You need to create a PHP file.


 Before you can use PDO, you need to use 'php.ini'


extension = php_pdo_mysql.dll


Will be added.


It's commented out, but I can not find it.


So, I entered it myself.


The PHP file was created as 'test1.php' in 'htdocs'.


The contents of 'test1.php' are as follows.


<? php
// fill in your form
$ mysql_hostname = 'localhost';
$ mysql_username = 'username';
$ mysql_password = 'Password';
$ mysql_database = 'test';
$ mysql_port = '3306';
$ mysql_charset = 'utf8';


$ dsn = 'mysql: host ='. $ mysql_hostname. '; dbname ='. $ mysql_database. '; port ='. $ mysql_port. '; charset ='. $ mysql_charset;

$ temp = $ _GET ['d']; // Get the value in get method.

try
{
$ connect = new PDO ($ dsn, $ mysql_username, $ mysql_password);

$ connect-> setAttribute (PDO :: ATTR_ERRMODE, PDO :: ERRMODE_EXCEPTION);

$ sql = "INSERT INTO sound (sound) VALUES ('$ temp')";
        // In the sound table, we will put the value we got in the sound place in the get method.
    

$ connect-> exec ($ sql);
    echo "New record created successfully";


}
catch (PDOException $ e)
{
echo 'Connect failed:'. $ e-> getMessage (). '';
return false;
}


$ connect = null;

?>


3. Upload the code using the Arduino IDE.


Click File - Example - esp8266httpclient - basichttpclient.


I set it up because it is a wemos D1 R1 board.


If you are using another board, please make the appropriate setting.


There are only two code modifications.


WiFiMulti.addAP ("WiFi name", "WiFi password");


http.begin ("http: // your own server IP / test1.php? d =" + String (temp));


For your own server IP, look at IPV4 by typing 'ipconfig' in the cmd window.


(For example, IPv4 :192.168.x.x)


Then upload.


If it works normally, the following screen appears on the serial monitor.


Once in mysql, the 'id' is incremented by one


You can see the 'sound' value coming in.


You can use this to send data from multiple Arduino to mysql.

Wednesday, September 5, 2018

[network] installing mysql, mysql 설치하기


mysql을 설치하는데 우여곡절이 많았습니다.


그래서 제가 하는 순서는 참고로만 봐주셨으면 좋겠습니다.


 mysql은 아래 주소에서 다운받았습니다.


1.  저는 installer을 이용해서 다운받았기 때문에 archive를 이용한 설치는 아닙니다.


다운로드에 대한 내용은 검색을 이용해주세요.


2. 환경변수에서 mysql 파일의 bin경로를 등록해줍니다.


3. cmd창에서 다음과 같이

mysql -u사용자이름 -p비밀번호 -hlocalhost를 입력합니다.


4. 성공하면 다음과 같은 화면이 뜹니다.


저는 에러가 떠서 확인해보니 

"서비스"에 mysql이 실행되지 않았습니다.


mysql을 실행시켰더니 서버에 들어가졌습니다.


There were many twists and turns in installing mysql.


So I would like you to take a look at the order I do for reference only.


  mysql was downloaded from the following address.


1. I did not install using archive because I downloaded it using installer.


For information on downloading, please use search.


2. Register the bin path of the mysql file in the environment variable.


3. In the cmd window,

mysql -u username -p password Type -hlocalhost.


4. If successful, the following screen appears.


I checked with an error.


Mysql was not running on "service".


When I started mysql, I entered the server.

[network] Installing PHP, PHP 설치하기


아파치를 설치했으니 다음은 PHP를 설치하였습니다.


아래 주소에서 PHP를 다운로드하였습니다.


* 아파치 버젼에 따라 설치 할 수 있는 PHP 버전이 다르다고 합니다.


1. 빨간 네모박스처럼 설치파일이 4가지의 종류로 있습니다.


저는 아파치를 사용중이고 64비트 운영체제이기 때문에

2번째 꺼를 받았습니다.

(vc15 x64 Thread Safe)


2. 그 이유는 아래와 같습니다.


IIS 를 사용중이라면  NON-THread safe를

아파치라면 Thread safe를 사용하라고 합니다.


그리고 VC15버젼인데 설치가 안되어 있다면

 이 설명창 아래에서 다운로드 받을 수 있습니다.


3. ZIP파일을 다운받고 이 경로에 압축풀었습니다.


4. 그리고 php.ini-production이라고 되어있는 것을 php.ini로 변경하였습니다.


다음으로 php.ini을 들어가서 설정을 바꿔줘야 합니다.


5. extension_dir을 검색하여 다음과 같이 바꿔줍니다.


앞에 ; 를 제거하고 "설치 경로/ext"로 바꿔줍니다.


그리고 저장합니다.


6. 다음으로 아파치 설정파일로 들어갑니다.


7. DirectoryIndex를 검색하여 다음과 같이 바꿔줍니다.


8. 그리고 다음과 같이 4줄을 추가해줍니다.


PHPIniDir "php설치경로"
LoadModule php7_module "php설치경로/php7apache2_4.dll"
AddType application/x-httpd-php .html .php
AddHandler application/x-httpd-php .php


그리고 저장합니다.


9. cmd창을 관리자 모드로 들어갑니다.


아파치 bin 파일로 들어가 httpd.exe를 재시작합니다.

(cd 아파치 bin파일 경로)


10. 아파치서버의 htdocs 파일로 들어갑니다.


다음과 같은 php파일을 만듭니다.


phpinfo란 php의 옵션을 보여주는 명령어입니다.


11. 인터넷 주소창에 http://localhost/phpinfo.php를 입력하고 엔터를 치면

다음과 같은 화면이 나오면 php설치 완료입니다.


Now that you have Apache installed, you have installed PHP.


I downloaded PHP from the address below.


* The version of PHP that can be installed depends on the version of Apache.


1. There are 4 kinds of installation files like red box.


I'm using Apache and it's a 64-bit operating system

I got a second blow.


(vc15 x64 Thread Safe)


2. The reason is as follows.


NON-THREAD safe if you are using IIS


Apache tells me to use Thread safe.


And if VC15 version is not installed


 This can be downloaded from the bottom of the description window.


3. I downloaded the ZIP file and extracted it to this path.


4. We changed php.ini-production to php.ini.

Next you need to go into php.ini and change the settings.


5. Search for extension_dir and change it as follows.


Before ; And change it to "install path / ext".


And save.


6. Next, enter the Apache configuration file.


7. Search DirectoryIndex and replace it with


8. And add 4 lines as follows.


PHPIniDir "php installation path"

LoadModule php7_module "php installation path /php7apache2_4.dll"

AddType application / x-httpd-php .html .php

AddHandler application / x-httpd-php .php


And save.


9. Enter the cmd window into administrator mode.


Enter the Apache bin file and restart httpd.exe.


(cd apache bin file path)


10. Enter the htdocs file on the Apache server.


Create the following php file:


phpinfo is a command that shows php options.


11. Type http: //localhost/phpinfo.php in the Internet address bar and hit enter


When the following screen appears, php installation is complete.


[Review] 졸업선물 - 신영준 Graduation gift


졸업선물 - 신영준


"내 의지보다 강력한 것은 환경이다."

----

저도 의지보단 환경이 어떠한 일을 하는데 강력한 동기가 된다고 생각하였습니다.


예를 들어 컴퓨터에 게임이 깔려 있으면 게임을 하느라 공부를 덜하게 되지만

게임을 지우게되면 어쩔 수 없이 공부를 하게 됩니다.


의지가 환경을 이기는 힘은 정말 마음을 굳게 먹어야 될 것 같습니다.

-----


"갑자기 어두운 곳으로 들어갈땐 우선 어두움에 적응하자"

-----

갑자기 상황이 안좋아지면 당황하지 말고 그 상황을 인식해야겠다고 생각하였습니다.


상황을 잘 인식하지 않고 급하게 움직이면 부딪치거나 넘어지게 되니 

어둠에 적응되는 것처럼 시간을 갖고 해결해야겠습니다.

-----


"남의 떡이 커보인다. 하지만 남도 내 떡이 커보인다."

-----

역지사지, 제가 제일 좋아하는 사자성어입니다.


남의 입장이 되어보자. 이는 서로를 조금더 이해하게 되는 방법인 것 같습니다.

-----


"소 잃고 외양간을 꼭 고쳐야 다음 소를 잘 키운다."

-----

외양간을 고치지 않은 것이 실수라는 가정하에

실수는 언제나 할 수 있으니 그 실수에서 배우면 된다는 말이었습니다.


실수에서 배우려면 먼저 도전을 해야겠다고 생각했습니다.

-----


"좋은 시스템이란 잡음 대비 메인 신호가 훨씬 큰 시스템이다."

-----

공학생으로서 시스템관련 글이 나와서 반가웠습니다.


좋은 시스템을 만들기 참 어렵다는 것도 알고

이상적인 시스템 또한 만들기 매우 어렵다는 것을 알고 있었습니다.


잡음은 어쩔 수 없지만 메인신호는 어쩔 수 있다는 것이 마음에 와닿았습니다.

-----


"매일 101%로 1년을 살면 대략37배가 된다" 

-----

예전에 이 글귀를 보고 턱걸이 갯수를 10개에서 20개로 늘릴 수 있었습니다.


1주일에 턱걸이 갯수를 1개씩 늘려 10주후에 한번에 20개씩 할 수 있었습니다.


티끌모아 태산이었습니다.

-----


"타인소개서"

-----

자기소개서가아닌 타인소개서를 쓴다는 것이 인상깊었습니다.


한편으론 중국집 대사가 생각났습니다.

'금방 출발했습니다.'

-----


"It is the environment that is stronger than my will."

----

I also thought that the environment was a powerful motive for doing things.


For example, if you have a game on your computer,

If you delete the game, you will be forced to study.


The power of the will to win the environment is really going to have to eat up my mind.

-----


"When suddenly going into a dark place, let's first adjust to the darkness"

-----

Suddenly, when the situation got worse, I thought I should recognize the situation without panicking.


If you do not understand the situation and move quickly, you will hit or fall.


As time goes by, I have to solve it with time.

-----


"The bread of the others looks great, but the bread of the south looks great."

-----

It is my favorite lion character.


Let's be a man's position. This seems to be a way to understand each other a little more.

-----


"I lose the cattle and I have to fix the barn to make the next cow well."

-----

Under the assumption that it is a mistake not to repair the barn

I can always make mistakes so I can learn from those mistakes.


To learn from mistakes, I thought I had to challenge first.

-----


"A good system is a much larger system than the main signal for noise."

-----

As a student, I was glad to hear about the system.


I know it's hard to make a good system.


I knew that creating an ideal system was also very difficult.


I can not help but notice that the main signal is unavoidable.

-----


"101% every day, it will be about 37 times when I live a year"

-----

I have been able to increase the number of jaws from 10 to 20 in the past.


I was able to increase the number of jaws per week by 20 pieces at a time after 10 weeks.


every little makes a mickle.

-----


"Others"

-----

It was impressive to write a non-self introduction letter.


On the other hand, I remembered the Chinese ambassador.


'It started right away.'

-----